How to Clean Your AC Condenser Coil?
Maintaining your air conditioning system is essential for its longevity and performance. One crucial part of AC maintenance is cleaning the condenser coil, which helps your unit run efficiently and prevents costly repairs. In this guide, we’ll walk you through how to clean your AC condenser coil step by step. If you want professional assistance, AirChill AC Maintenance and Duct Cleaning offers expert AC cleaning services to keep your unit in top shape.
Why Cleaning Your AC Condenser Coil Is Important
Over time, dirt, debris, and grime build up on the condenser coil, reducing your AC’s cooling efficiency. A dirty coil makes your unit work harder, leading to higher energy bills and potential system failures. Regular cleaning ensures:
- Improved energy efficiency
- Better cooling performance
- Longer AC lifespan
- Reduced risk of breakdowns
Signs Your AC Condenser Needs Cleaning
Before you start cleaning, check for these signs that indicate a dirty condenser coil:
- Weak airflow or reduced cooling efficiency
- Unusual noises from the outdoor unit
- Higher electricity bills
- AC running longer than usual to cool your space
- Visible dirt and debris on the coil
If you notice any of these issues, it’s time to clean your AC condenser coil.
How to Clean Condenser Coils Properly
Condenser coils play a critical role in cooling systems—whether it’s your split AC, car AC, refrigerator, or dehumidifier. Over time, dust and debris build up on these coils, reducing efficiency and increasing energy costs. Learning how to clean condenser coils correctly helps keep your appliances running smoothly.
How to Clean Condenser Coil in Split AC
To clean the condenser coil in a split AC, follow these steps:
- Turn off the power to the indoor and outdoor unit.
- Remove the outdoor cover to expose the coil.
- Use a soft brush or coil cleaner spray to remove surface dust.
- For deep cleaning, use a low-pressure water hose (never high pressure).
- Let the unit dry completely before turning it back on.
This process ensures that your split AC maintains cooling efficiency, especially in dusty environments.
How to Clean AC Condenser in a Car
Knowing how to clean AC condenser in a car is essential for consistent performance:
- Open the hood and locate the AC condenser in front of the radiator.
- Spray with water to remove loose debris.
- Use a coil cleaner suitable for automotive use.
- Rinse thoroughly and allow to dry.
If the condenser is heavily clogged, it’s best to consult a professional technician.
How to Clean Condenser Coils in Home Appliances
How to Clean Condenser Coils in Refrigerator
- Unplug the unit.
- Locate the coils (usually behind or beneath the fridge).
- Use a coil cleaning brush and vacuum to remove dust and lint.
How to Clean Condenser Coils on Dehumidifier
- Turn off and unplug the unit.
- Access the coil section by removing the cover.
- Use compressed air or a soft brush to clean the coils gently.
How to Clean Condenser Coils on Dryer
- Unplug the dryer.
- Remove the rear panel to access the condenser area.
- Use a vacuum or brush to remove lint and dust buildup.
How to Clean Condenser Coils in Portable Air Conditioner
- Turn off the unit.
- Remove the rear panel to access the coils.
- Use a soft cloth or vacuum brush to clean.
- Avoid soaking the coils to prevent damage.
Best Coil Cleaner for AC Unit
When choosing the best coil cleaner for AC unit, opt for a non-acidic foam coil cleaner. These are safe for aluminum and copper coils and effectively loosen stubborn dirt. Some trusted brands include:
- Nu-Calgon Coil Cleaners
- Frost King
- CRC Foaming Coil Cleaners
How to Clean AC Condenser Coil in Window Units
To clean AC condenser coil in window air conditioners:
- Unplug the unit and remove it from the window.
- Remove the outer casing to expose the coils.
- Apply a coil cleaner, wait 5–10 minutes, then rinse carefully.
- Let it dry fully before reinstallation.
How to Clean AC Condenser Coil Filter
In many units, the condenser coil filter traps large particles before they reach the coils. To clean:
- Remove the filter and wash it with mild soap and water.
- Dry completely before reinserting.
For Carrier AC units, refer to your manual to learn how to clean AC condenser coil in Carrier models specifically, as some may have built-in filters or unique coil designs.
Condenser Coil Cleaning Cost (Quick Reference Table)
| Appliance/Unit | Estimated Cleaning Cost (USD) | DIY or Professional? |
|---|---|---|
| Split AC Condenser Coil | $30 – $80 | DIY or Professional |
| Car AC Condenser | $20 – $60 | Usually DIY |
| Refrigerator Coils | $10 – $30 | DIY |
| Portable Air Conditioner | $20 – $50 | DIY or Professional |
| Dryer Condenser Coil | $15 – $40 | DIY |
| Window AC Unit | $25 – $60 | DIY or Professional |
| Dehumidifier Coils | $15 – $30 | DIY |
How to Clean Your AC Condenser Coil at Home
Cleaning your AC condenser coil is essential to maintain your system’s efficiency. Turn off the power to your unit. Use a soft brush or vacuum to remove surface dirt. Then apply a condenser coil cleaner spray and let it sit for a few minutes before rinsing it off with water. Doing this every few months can boost your AC performance and reduce energy consumption.
Step-by-Step Guide to Cleaning Your AC Unit Inside
To clean the AC unit inside, start by turning off the power supply. Remove the outer panel carefully. Use a soft brush to clear off any dust from the coils and other parts. Spray a no-rinse coil cleaner on the indoor coil and allow it to dry. Clean or replace the air filter to improve airflow and air quality.
How to Clean Condenser Coils in a Refrigerator Safely
Dust and grime on refrigerator condenser coils can make your appliance work harder. To clean them, unplug the fridge, locate the coils (usually at the back or bottom), and use a coil cleaning brush or vacuum to remove buildup. Doing this twice a year can help your fridge cool more efficiently.
Best Way to Clean Indoor AC Coils for Better Cooling
Indoor AC coils collect dust over time and reduce cooling power. To clean them, remove the access panel and spray a no-rinse coil cleaner directly on the coils. Let the foam dissolve the dirt. After a few minutes, wipe off any residue using a clean cloth. This quick fix can improve the performance of your indoor unit.
How to Clean an Evaporator Coil Without Removing It
Worried about dismantling your unit? You can clean the evaporator coil without removing it. Just turn off the AC, open the access panel, and spray a no-rinse evaporator coil cleaner. Let the cleaner break down dirt and debris. You can also use compressed air for a dry clean. Always follow safety precautions.
How to Clean the Condenser Coil in a Split AC System
In a split AC, the outdoor unit houses the condenser coil. Turn off the unit and open the cover. Remove loose debris and use a garden hose (not too strong) to spray the coils. You can also apply a foaming coil cleaner and rinse after 10–15 minutes. Make sure to avoid damaging the delicate fins while cleaning.
What is a Coil Cleaner and How to Use It Properly
A coil cleaner is a specially formulated solution designed to clean HVAC coils without damaging them. Available in foam or liquid form, it helps break down dust, grease, and mold. Apply it evenly, let it sit, and rinse if needed. Choose a no-rinse version for indoor use and a rinse-off version for outdoor coils.
How to Clean Blue Star AC Indoor Unit: Easy DIY Tips
To clean your Blue Star AC indoor unit, remove the front panel and filters. Wash the filters with water and let them dry completely. Spray coil cleaner on the cooling coil and wipe it down after a few minutes. Don’t forget to clean the blower and drain line. Reassemble once everything is dry.
Condenser Coil Cleaning Cost: What You Should Expect
If you’re hiring a professional, condenser coil cleaning cost can range between $75 to $200 depending on your location, AC model, and level of dirt. DIY methods are cost-effective, but if your system hasn’t been cleaned in a long time, a professional job ensures deep cleaning and better performance.
Tools and Materials Needed
To clean your AC condenser coil, gather the following supplies:
- Screwdriver or wrench (to remove the outer cover)
- Soft brush or fin comb
- Garden hose with a spray nozzle
- Coil cleaner (commercial AC coil cleaner or mild detergent and water)
- Gloves and safety goggles
Step-by-Step Guide to Cleaning Your AC Condenser Coil
1. Turn Off the Power
Before starting, switch off the power to your AC unit at the circuit breaker. This ensures safety while cleaning.
2. Remove Debris Around the Unit
Clear away leaves, dirt, and any debris around the outdoor condenser unit. This prevents further buildup and improves airflow.
3. Access the Condenser Coil
Use a screwdriver to remove the outer panel or grille covering the coil. Be careful not to damage the fins.
4. Brush Off Loose Dirt
Gently use a soft brush or fin comb to remove loose dirt and dust from the coils. Avoid bending the delicate fins.
5. Apply Coil Cleaner or Soapy Water
Spray a commercial AC coil cleaner evenly over the coils. If you don’t have a coil cleaner, mix mild detergent with water and apply it with a spray bottle.
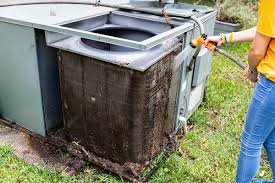
6. Rinse with a Garden Hose
After letting the cleaner sit for 5–10 minutes, use a garden hose to rinse the coils. Spray at a low pressure to avoid bending the fins.
7. Let It Dry and Reassemble
Allow the coil to air dry completely before reattaching the outer panel. Once everything is in place, restore power to your AC unit.
How Often Should You Clean Your AC Condenser Coil?
For optimal performance, clean your AC condenser coil at least once or twice a year. If you live in a dusty area or have pets, more frequent cleaning may be necessary.
Professional AC Cleaning Services
While DIY cleaning is effective, professional AC maintenance ensures a deeper clean and prolongs your unit’s lifespan. AirChill AC Maintenance and Duct Cleaning provides expert AC condenser cleaning services to keep your system running smoothly. Our technicians use advanced tools to remove stubborn dirt and ensure your AC operates efficiently.
Final Thoughts
Regular maintenance, including cleaning the AC condenser coil, improves energy efficiency, enhances cooling performance, and extends the lifespan of your unit. By following this guide, you can keep your AC in top condition. For hassle-free maintenance, contact AirChill AC Maintenance and Duct Cleaning today!
Call us now for professional AC cleaning services and enjoy a cooler, more efficient home!
Not Sure What’s Wrong With Your AC?
Send AirChill AC Maintenance & Duct Cleaning LLC a quick message. Tell us your AC issue, location and property type, and we’ll guide you on the right next step.
Talk to an AC Expert NowRelated AirChill AC Maintenance & Duct Cleaning LLC Services
Need help with AC repair, maintenance, cleaning, duct cleaning or installation? These services may help.
Need Professional AC Help?
Talk to AirChill AC Maintenance & Duct Cleaning LLC for AC repair, AC maintenance, AC cleaning, AC duct cleaning or AC installation services in Dubai, Sharjah and Ajman.
Talk to an AC Expert Now